Showing posts with label collage and mixed media. Show all posts

Wednesday, April 25, 2012

Mini Composition

I don't know about you, but I just love things in mini.


 Everything seems more charming in mini...babies, kittens, tea sets and even these mini composition books!Plus I'm sort of on a roll with covering all kinds of notepads and notebooks lately. Muslin, canvas, and burlap all seem to be textures that I love for a base. Plus, they are pretty neutral palettes to begin with.      

 
I simply stamped French script as a background and then added a flower stamp.


 In keeping with the theme, I then machine-stitched French lace onto the canvas.


 Last, I hand-sewed a button onto each and glued them down. And VOILA! Just a nice little notebook to carry in with you. These will be available on my Etsy shop.

Monday, March 26, 2012

Spring Is Here!


Well, I sidestepped my last project temporarily. It's that I'm waiting for my new glasses that are being made for the third time...it's a process. So, in lieu of doing any close up work that is tough at the moment; I decided to fill my blank wall in the living room with some summer collages.It may not look like Spring in some parts; although here in California it is beginning to. We still have a lot of overcast and some rainy days. Those days, I struggle with feeling down and decided to boost myself up and get into Spring!

 
First I took 8x10 canvases and added torn-edged, patterned/text papers with gel medium and applied a light coat of acrylic paint.


 After drying, I added another coat of acrylic.


And then wiped most of it off to reveal the layers.


Next I stamped randomly around to add more 'texture'.


This is what I ended up with.


I selected some collage papers and roughly cut out flower shapes and centers. Also, I had some hand-made paper that has actual leaves and stems imbedded in it...I thought that would be cool to cut out and use.


Those were pasted down with gel medium also.


 After that I added some yellow and white paint to make the flowers 'glow' a bit to look bright and happy. Finally, I outlined the flowers and leaves with a copper gel pen and put some scrapbook flowers and buttons in their centers.


And...voila! No more blank wall and a happy, sunny one in it's place! (Ok, they aren't hung straight yet, lol! The camera is probably wonky too.) Have a wonderful, looking-forward-to-Spring day!

Friday, March 9, 2012

Notepads to Notebooks


The notepads below reminded me of a notebook I made a couple years ago inspired by Jane Eileen  in an old 'Sew Somerset' magazine.It is a well-loved item that I still use(note the missing button!). I recalled how much I enjoyed this project and how many compliments I got on it from my fellow Chemistry students. (It made Chem. better!)


So I dug around and found my leftover upholstery fabric and samples(TIP: You can grab the bits of samples free at your local craft/fabric store!)


 And grabbed an old notebook for sizing.


 And off I went creating a design.


For the words, I used my printer. I applied iron-on stiffener to the back of the muslin, then glue sticked the bottom edge to a piece of printer paper to feed it through my printer. Be sure to change the setting to 'Specialty Paper' or 'Cardstock' to get the printing heavy enough.


  decided to make a book mark to go along with it too.


The fun part is left! Erratic, free-sewing! I'll show you that and the finished product coming up soon! Enjoy your day!

Saturday, March 3, 2012

Listless No More!


Admittedly, I've been a bit listless lately. Just a few too many overcast days and seasonal allergies leaving me a lethargic and unambitious. On one of those days I got to thinking about how much I like notebooks and making lists...I started gathering forgotten little crafty treasures that I squirrel away for just the right occasion.


 First, some blank 3x5 note pads.

 Assorted buttons.
A mix of lace and ribbon scraps.
Old muslin scraps that I experimentally stamped some bird cages that I never used, and tried a few word stamps to go with them...and grabbed the sewing supplies.


 Lists serve many purposes: 1.)On the fridge to jot items I need on the next major grocery haul. 2.)In my work tote for ideas that strike me, quotes etc. 3.)On my desk or by the phone to organize all those 'to-dos'. 4.)Random stuff. Ok, much of the time, my creative ideas don't see action for months or years but they are there for those days that I start wondering what I was thinking...back when? And, yeah, many of the 'to-dos' get re-prioritized, forgotten and ignored; but they still serve their purpose in organizing my thoughts when I get overwhelmed. (Can I get an amen here, ladies?!) Whatever the purpose they serve; those little lists and notepads are just a bit nicer when you have something pretty to write in!


Armed with my new note pads and a sunny day...I am not longer LISTLESS! If you like these, you can find them on my etsy shop. Have a lovely day!

Friday, August 20, 2010

This is my kind of Tweet!


I'm sorry to say, I am not a Tweeter. Maybe it's because I was so into the whole IM thing when it first came out in the 90's and I'm just kind of over it. Really, I'm just not that interesting on a moment to moment basis! These two pieces were inspired by Claudia Hellmuth, who is one of my favorite artists. I just love her whimsy and she was actually the first to inspire me to mixed media when I saw(and now own) Collage Discovery Workshop in a bookstore.

You can see how to make these pieces in Somerset Apprentice (Vol. 1), so I won't go into the details. However, I will tell you that the edgework here was an accident. I used painter's tape to cover the top of the canvas so that I could get a clean line when I painted the sides black. However, I had too much water on my brush and the black seeped onto the top of the canvas. Rolling with it, I just added some swirl stamps to the edge on top of it and ended up loving the look! This completes #17 of Project 52.

Do you redo things when you make mistakes? Or do you just embellish and adapt them like I do?

Sunday, August 15, 2010

Groovy Baby!

Oh what a lot of fun this was! The perfect opportunity to use all those gaudy, bright colors in one piece! This piece was inspired by Shelley Ozbirn. Her 1970's assemblage piece was featured in Cloth, Paper, Scissors (Sep/Oct '09). And so, I created #16 of Project 52.

I was fortunate in doing mine as I had been to a '60's inspired New Year's party this year. We were given party trinkets of necklaces with musical notes and mini, vinyl records. Also, my fiance received (and wore proudly and comically), a pair of guitar glasses. I sawed off one guitar; it was the perfect size here.
The pants are made with various strips of cardstock, mini paper flowers, and Stickles. The belt buckle are cut from an old black leather jacket.

The background was created using thick white acryllic, which was then stamped in and textured with various objects. I drew the word 'groovy' and some peace signs into it. Then when dry, I painted a couple different washes over it and stamped again with stars. Black Stickles were added to the peace signs and word. Naturally, I used the necklaces for a hanger and attached the mini record to the bottom.

One of the most fun parts of this project for me was researching the '60's! This is a fun way to celebrate the year of your birth and find out what life was like then.

Tuesday, August 10, 2010

Paper Dolls

If you want a quick, fun project to do by yourself or with kids, I recommend Sandra Evertson's book, Fanciful Paper Projects. You just need to copy, cut, and glue. Of course, if you're a little more ambitious and creative; add some of your own embellishments. Here's a closer look at Violet.
And Second Prize.
And lastly, Narcissus.
They are 'hanging out' on my bulletin board cheering me on to create. I also made this lovely Prima Ballerina.
Instead of using the paper cut outs, I added my own beads and glitter to her crown,

and to her dainty feet.
I just love the paper flowers that Sandra included. I also chose to color in the dress a bit and (of course) add more glitter glue!

And that's it, #14 and 15 of my Project 52. Short and sweet!

Monday, July 5, 2010

Family Trees and Free Templates

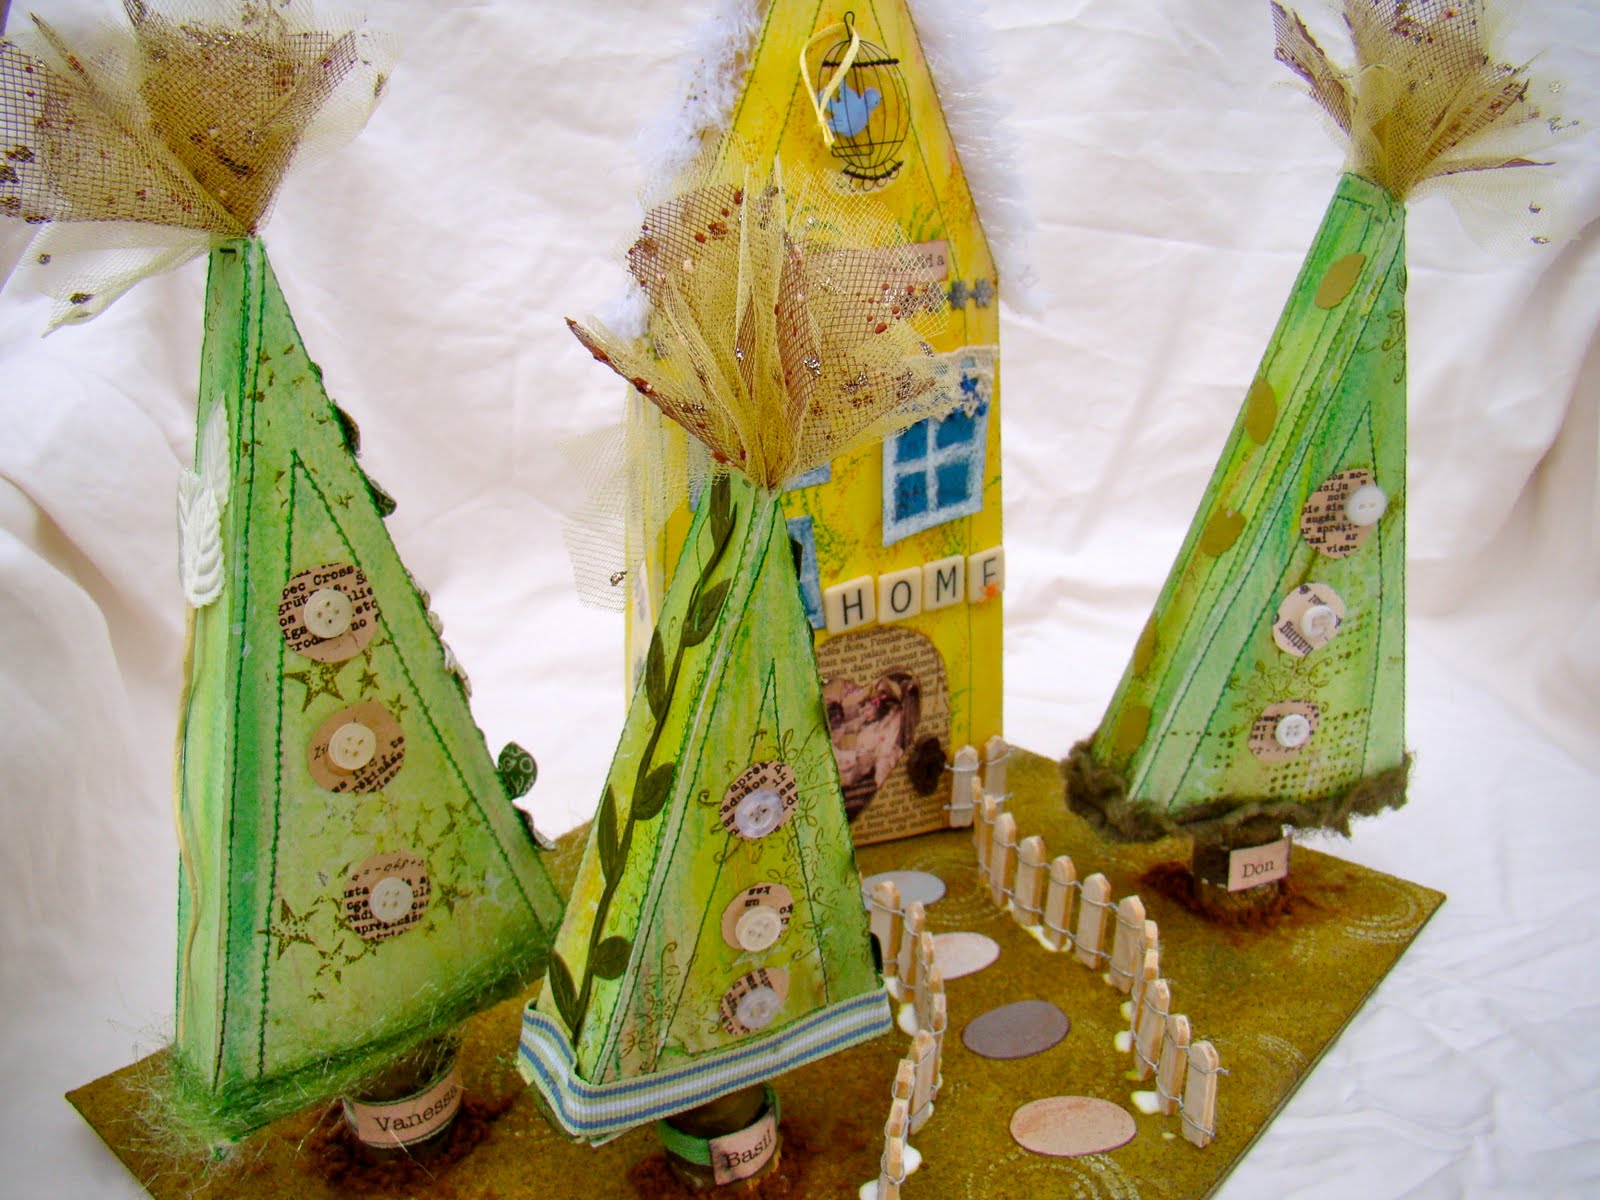
I hope you all enjoyed a fun 4th! We actually went to see 'Knight and Day'; which I thought was a lot of fun! Today I have #13 of my Project 52. This was inspired by Coleen Sohn's 'Making Roots' in Sew magazine. You can visit her blog here. Don't you just want to walk up the cobbled path and visit?
Basically, you cut out the shapes onto watercolor paper and stitch them onto stabilizer. Then glue the pieces together and paint and embellish them. They are then stuffed and the bottoms closed. I assembled mine a bit differently than Coleen and have included the templates that I made at the end of this post.
I thought you might like to see a few close ups of the details(I always like looking at those on other people's projects!). The trees sport the names of myself, my son, and my fiance on their trunks.
I popped up one of the windows and added some lace.
Quotes were added to each side of the house.
Each tree was embellished slightly differently to reflect the personalities. For instance, this one has flowers to be more feminine(me).
Rather than have the pieces stand alone where they would surely be knocked over by a breeze or fan, I chose to create a 'yard' for them and glued them on.
Here are the templates if you would like to create your own 'family trees'. Have a great day! You could just print different sizes of trees for wee ones etc. Just right click on them to save them to your computer and print in whatever size you like.


Cards That Pop!

   Black makes colors really pop, there's no doubt about it. It's why we go to the classic 'little black dress' for spec...